Featured Post

So Fresh and so Clean: DIY Daily Brush Cleaner!

Let's talk makeup brushes: they are a necessity for an expertly applied face, but they can be a PITA to keep clean! Cleaning your brushe...

Showing posts with label Review. Show all posts

Friday, March 31, 2017

Review: Benjabelle Sunflower Brush Tree

Hi Lovelies -

Hope you are well, and that spring has sprung where you are! We are expecting a SNOWSTORM here in New England, and it's no April Fool's joke!

To get my mind off of snow and on to warmer weather, I've been thinking about flowers...Sunflowers to be exact. For Christmas my DH gave me a Benjebelle Sunflower Brush tree*, and I've been meaning to review it; so, what better time then now - with snow in the forecast, but spring on my mind?

Benjabelle is a small, Madison, WI based company owned by Ben and Jan. According to their website, one day Jan was washing her makeup brushes when she asked Ben if they could  create a device that would allow her brushes to dry vertically, thus minimizing dry time and reducing the space the brushes take up on the counter. They put their heads together, and voila!-  the Benjabelle brush tree was born!

There are 5 different styles of brush tree to choose from, all of which are available in your choice of black, white or pink:

  • Original $34.95- holds 14 large brushes or up to 42 small brushes
  • Daisy $19.95- accomodates 2 large brushes, 4 medium, and 8 small
  • Mini $24.95- dries up to 24 thin brushes
  • Tulip $24.95- holds the same number of brushes as the Daisy, but in a more compact setup
  • Sunflower $39.95- the largest of the brush trees, and the one I will review for you today
There is also an optional Spinner available for $12.00, which converts any of the above models into a rotating brush tree, and creates 4 "cubbies" in which you can store small items, like brush cleaner or makeup sponges. In addition to the brush trees, Benjabelle also offers organic brush shampoo, foaming wash, and cleansing balm


The Sunflower Brush Tree

The Sunflower is the largest of the 5 brush trees available from Benjabelle. It costs $39.95, plus shipping ($4.95 in the US).

Benjabelle Sunflower Brush Stree

Please excuse the water spots - it's a well loved brush tree :)

 The brush tree consists of a plastic "top" with various silicone holders for your brushes, as well as the base (two plastic "legs"). It is simple to set up and to disassemble, and takes up very little space on your counter. When broken down, it is about the size of a typical tablet, and can be easily stored away.  All materials used in the brush trees are made in America, and the silicone used in the gripper slots is peroxide free and FDA approved.

Close up of the silicone brush holders


This brush tree easily fits all of my makeup brushes

According to the website, the Sunflower can dry 4 large brushes, 6 medium brushes, and 16 small brushes; however, I can tell you from personal experience that, depending upon the thickness of your brush handles, you can get many more brushes comfortably into the slots. IE: For small eye brushes, I can typically get two per small slot, making a total of 32 brushes just in the small holders! I can fit up to 4 small brushes in the medium slots,  2 medium brushes in the large slots, etc. - it's exceptionally versatile! On this particular day I did not have too many brushes to clean, but on a typical day this tree is packed! I can wash practically every brush I own, and I'm able to fit them all in with a little strategic placement.

Simply push the brush handle up through the silicone slot, and you are good to go!

Water drips down from the brushes, resulting in shorter dry-time

I'm amazed at how quickly the brushes dry when hung upside down like this! I used to lay my brushes down on top of the microfiber mat, prop cans of hairspray underneath so they drained properly, and even went to far as to individually wrap each brush head in toilet paper or paper towels to facilitate dry time! Talk about time-consuming! This is so quick and easy - wash the brush, squeeze out excess water, and pop it up into the silicone slot! Within a couple of hours, the small brushes are dry, and the larger brushes are well on their way to being dry! What used to be a 24 hour process has been cut down by at least half!

The Sunflower Brush Tree can accommodate a variety of brush sizes

Drying brushes upside down gives your brushes a longer life
 Drying your brushes in this vertical position (bristles down) helps prolong their life. When brushes are dried on their side- or worse, bristles up -  water can pool at the base brush. This causes damage to both the bristles, as well as the ferrule (part that holds the bristles together and attaches the brush head to the handle), resulting in a loss of bristles, or even the total destruction of the brush. The more you know... (insert musical notes here).


When I opened my brush tree after getting it for Christmas, I was very sad to discover that one of the plastic legs was cracked in half. I tried to glue it back together, but it just didn't line up correctly. I emailed Benjabelle, and quickly received a response from Ben, who told me that he was sorry to hear that I received a broken leg and that he would mail me out replacement legs right away. Only a few days later, I received my new legs, along with a bonus brush Cleansing Balm! So thoughtful! I am very happy to say that not only is the product amazing, but the customer service is wonderful as well!


Benjabelle Organic Brush Cleansing Balm


The Cleansing Balm is available for $14.95 on the Benjabelle website. It comes in a small metal tin, making it easy to use and store. It is made with natural ingredients, free from preservatives, artificial colors and fragrances, and animal byproducts. I was impressed with how well it  deep-cleaned my brushes - removing all traces of foundation and concealer - and that it also conditions the bristles, leaving them so soft and well-maintained!

Filthy foundation brush, ready for a thorough cleaning!


So easy to use, simply dampen, swirl in the the tin, and rinse!

I give the brush a little swipe over my Sigma Express Spa Glove, and then rinse away the old makeup!

Sparkling clean, well-conditioned brush!


Final Thoughts

I am thrilled to have received this brush tree for Christmas - it has been a game-changer for sure! I still may not LOVE the task of brush washing, but having this little gem makes things so much easier; it takes up less of my time and counter space, and it drastically reduces drying time! I have had such a great experience with the products and the company that I highly recommend the Benjabelle brush tree and the cleansing balm to anyone who owns makeup brushes.  I am thinking of ordering the spinner soon to see how it works...if I do, I will be sure to let you all know my thoughts! 

Have you tried any of the Benjabelle Brush trees, or a similar product? What are your thoughts?

Thanks so much for checking out this post! Have a great weekend, and live a beautiful life!

~Jessica

*The Benjabelle Sunflower was purchased at full price. This review was not sponsored by Benjabelle in any way. All opinions are my own, and are based on my experiences. 


Thursday, April 23, 2015

Three Things Thursday 4-23-15

 Hi there lovely readers! Welcome back to another edition of Three Things Thursday - read on to find out what is making me smile this week!

MAC Lipstick in Up the Amp

Lavender Violet Lip Color
MAC Lipstick in Up the Amp
Swatch - Up the Amp
Such a gorgeous spring shade - very outside of my normal inclination towards nude/mauve lip colors. Up the Amp is one of MAC's Amplified Cream Lipsticks in a relatively daring Lavender/Violet color. It applies super smoothly, and has a nice, soft finish - neither too matte nor too glossy. It is non-drying, lasts for a reasonable amount of time and has a pleasant vanilla scent. It is well worth the $16 price tag. This is my first MAC lipstick, and based on its performance, I will be purchasing more!


Friday, January 30, 2015

Draw a line and erase it with Rimmel London

Hi Lovelies!

I was happy to have received the Influenster Frosty Voxbox* a month or two back, and in it were some pretty cool items. Two that stood out to me were Rimmel London products: the Scandaleyes Waterproof Kohl Kajal liner in black, and the Gentle Eye Makeup Remover. Now, I'm no stranger to Rimmel London; I own many of their products, including the Kohl Kajal liner in a variety of colors, and I have been very pleased with the performance of the items I've purchased. The two products I received in my Frosty Voxbox were no exception.

On the Rimmel London  website, they claim that the Scandaleyes Waterproof Kohl Kajal liner is an"ultra smooth & creamy formula that glides on easily" and that it is "waterproof, smudge-proof, sweat-proof, heat-proof, humidity-proof and scandal- proof". I put it to the test to see just how true those statements are...

After using the liner for several days, I can say that it applies smoothly, with no tugging or sticking.  The color is a rich, matte black, even in the waterline, and I have no issues with irritation when I apply it to my waterline. From my experience, the liner lasts for quite awhile, on lid and waterline. I did notice that it smudges rather easily; it seems that it never quite "sets", so if you rub your eye, expect to see the liner on your hand. I will admit that I have oily eyelids, so perhaps if you have dryer lids you will not experience this problem.


I applied Scandaleyes Waterproof Kohl Kajal on my upper and lower lashlines, as well as my lower water line. I used a flat eyeliner brush to wing out the liner on the top lid,  as well as to smudge out the liner on my lower lashline. The product applied very nicely using this method. 


  On my eyes I used the It Cosmetics Naturally Pretty Volume 1 palette. I applied Sheer Joy on my entire lid from lashline to brow,  Mocha in the crease, Soft Light on the lid, and Transforming Pearl as a highlight on my brow bone and inner corner.

 
Below is a comparison of the liner from the time I put it on at 7:30 am, until the time I took it off 14 hours later at 9:30 pm. As you can see, while the line has faded and worn away a bit, it is still very defined and noticeable. I would say that is excellent wear time for a drugstore liner - in fact, that's excellent wear time for any liner!

Liner when first applied at 7:30 am

Liner after 14 hours of wear, at 9:30 pm

In the Frosty Voxbox, I also received Rimmel London Gentle Eye Make Up Remover. I don't know about you, but I wasn't even aware that rimmel had an eye makeup remover - I've never seen it in a store! As stated on the website, this is a "long lasting and waterproof eye make up remover that
gently removes all eye make up, including long lasting & waterproof make up, with no oily residue."


I will definitely agree that there is no oily residue with this makeup remover. I was actually surprised by how well it took off my liner and mascara, as I have found that oil-based products usually do a much better job than those without oil. While it did remove the majority of eyeliner and most of my mascara, I still had to use two cotton balls soaked in the solution and rub with a little more pressure in order to get it all off. I was wearing regular mascara on the days I tried out the product, so I am interested to see how it removes waterproof mascara (which I wear more in the summer). Overall, I was pleased with the performance of the makeup remover, but I think I will continue to purchase my oil based removers once this is all gone, because I like to remove my makeup easily, and with one cotton ball.


One eye after my makeup had been removed
 

All in all, I am a big fan of Rimmel London products. The Kohl Kajal pencils are so versatile - you can use them to create a sharp line, or easily smudge them out for a smoky look. They last throughout the day, and come in a nice variety of colors. I will continue to purchase the Scandaleyes liners because they perform beautifully and I have had great success with their longevity and ease of application.

As for the Gentle Eye Make Up remover, I will not be purchasing it in the future, as there are products out there that work better for me (even plain coconut oil). I personally do not mind a greasy residue if I am able to remove all of my eye makeup with one cotton ball and no pulling or aggressive rubbing. If you prefer to have no oiliness left behind from your makeup remover, then this will be perfect for you.

Have you tried Rimmel London products? If so, what was your experience with them?

Thanks for checking out this review!

 Live a beautiful life, 

~Jessica

*Items were received complimentary via Influenster Frosty Voxbox for review purposes, however all opinions are 100% my own.

Tuesday, January 20, 2015

Review and Look: Urban Decay Naked on the Run

I purchased the Urban Decay Naked on the Run Palette the first day it came out, so now I've had almost  two months to play with it and give you my thoughts.


According to Urban Decay, this "ultimate travel kit for Naked junkies... comes with everything you need for a complete Naked look", and I must agree with that statement. Aside from items such as concealer, foundation, and setting powder, you can easily create a complete look using only items from this palette.

Naked on the Run comes housed in a metal compact that measures approximately  5.5 x 5.5. It is rose gold in color, with "mesmerizing artwork" on the top of the case. The artwork sort of reminds me of those Rorschach tests - not really my style, but I guess it's a cool effect.

The included mirror is huge - essentially the size of the compact itself.  If you are traveling and this is the only mirror you have available, you shouldn't have any issues with seeing your entire face.


Naked on the Run comes with 6 "never before seen shades" of eyeshadow, a blush, bronzer, lipgloss, eyeliner and mascara. Many people think that the large white product on the lower right corner is a highlighter, but it is in fact an eyeshadow, which UD dubs "the perfect all-over shade"; however, being a slightly shimmery cream color, it can double nicely as a highlighter if needed. 


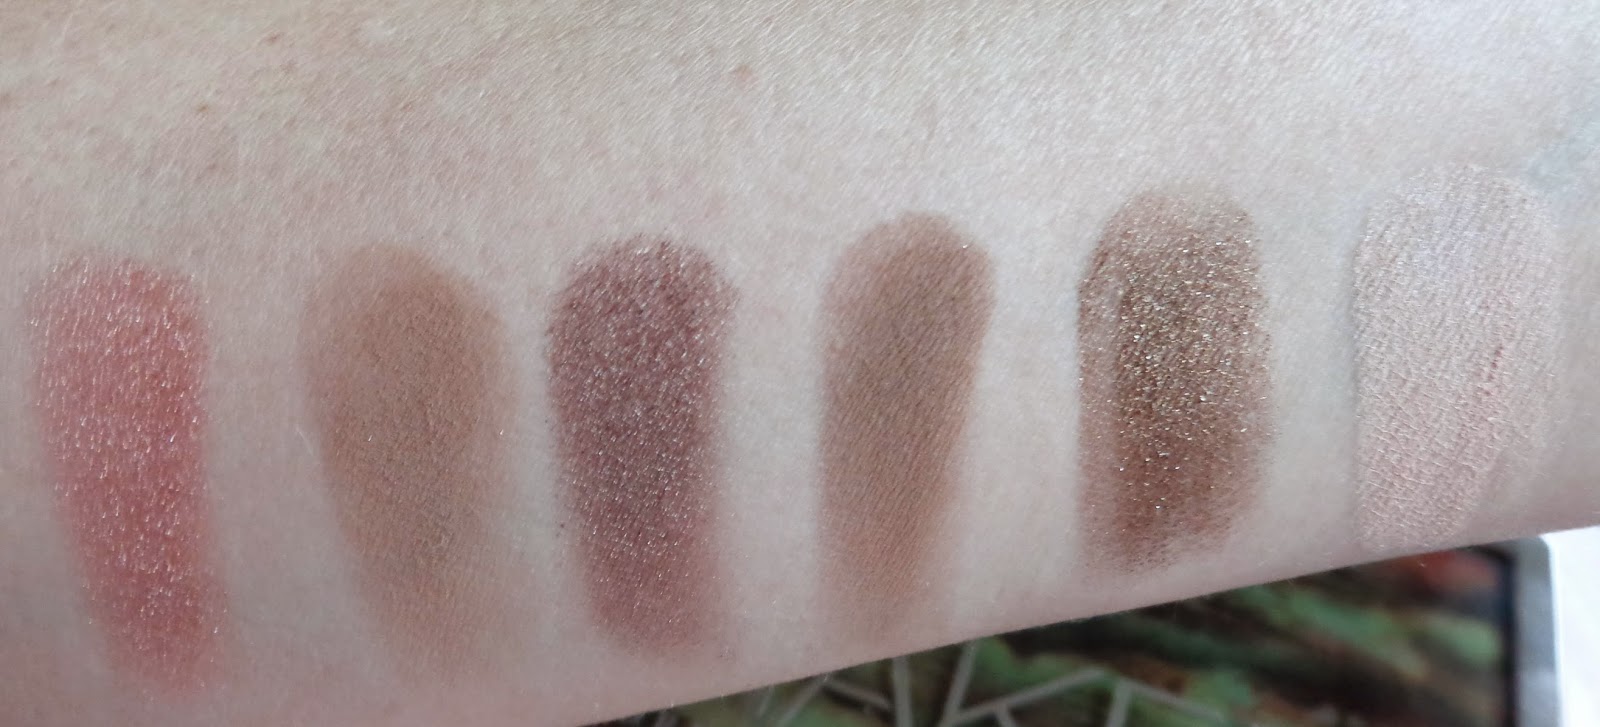
The shades of eyeshadow are: Dive (metallic rose with golden micro-shimmer), Fix (soft taupe matte), Resist (medium metallic taupe), Dare (medium brown matte), Stun (metallic bronze with light gold micro-shimmer) and 5050 (cool bisque satin). The Blush and bronzer do not have any names, but the website describes the bronzer as being a medium bronze matte and the blush as a vibrant pink with light shimmer


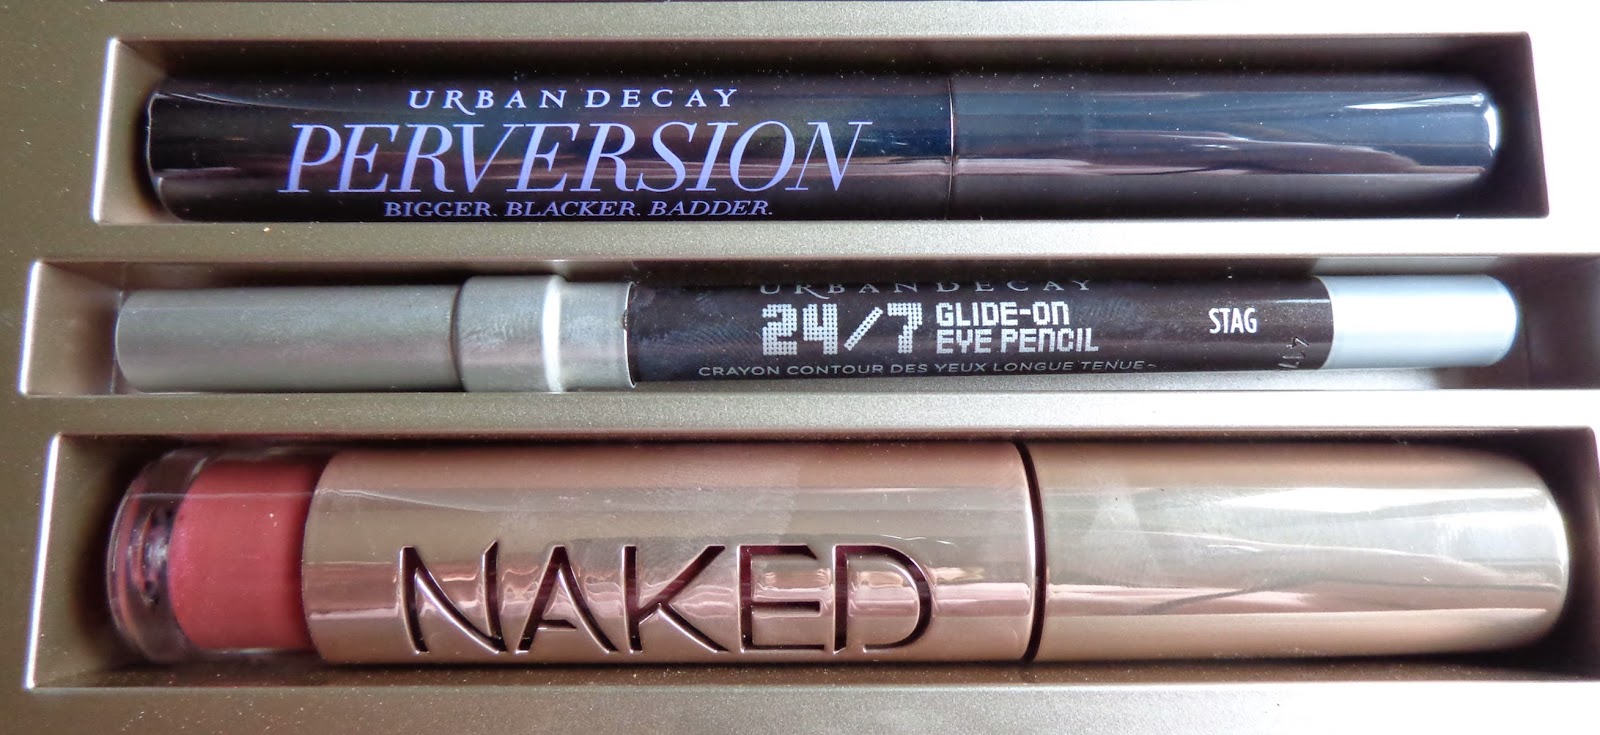
The palette also comes with a travel size Perversion Mascara, a travel size 24/7 Glide on Eye Pencil in Stag (a deep brown satin) and a full sized Naked Lipgloss in Sesso (rose with pink shimmer). On the website, UD emphasizes the fact that the gloss is full sized:
"With a lot of all-in-one palettes, you run out of lip color long before everything else. Not so with Naked on the Run, because the Naked Lipgloss is FULL-SIZE"  
It is a nice feature to have in the kit, and it allows you to swap out shades with other UD glosses you might own. You can also swap out eyeliners (if you have other travel sized shade, or you have used enough of a full sized shade that it will fit into the slot). The only thing that you might have trouble replacing is the mascara... unless you're like me and have a bazillion mascara samples. Out of all the small mascaras I have, one or two are bound to fit....right? 


Now for some swatches:


 L-R: Dive, Fix, Resist, Dare, Stun and 50/50


L-R: Bronzer, Blush, Eye Pencil in Stag and Lip Gloss in Sesso
 All powder products are nicely pigmented and blendable, with the texture and consistency I've come to expect from Urban Decay. While there is some fallout, that is no big surprise as many  UD shadows have a little fallout, especially those with shimmer. The lipgloss is absolutely lovely - a "your lips but better" shade great for everyday. The liner included in the palette is my all-time favorite liner color - a deep blackish-brown shade that works for all occasions.


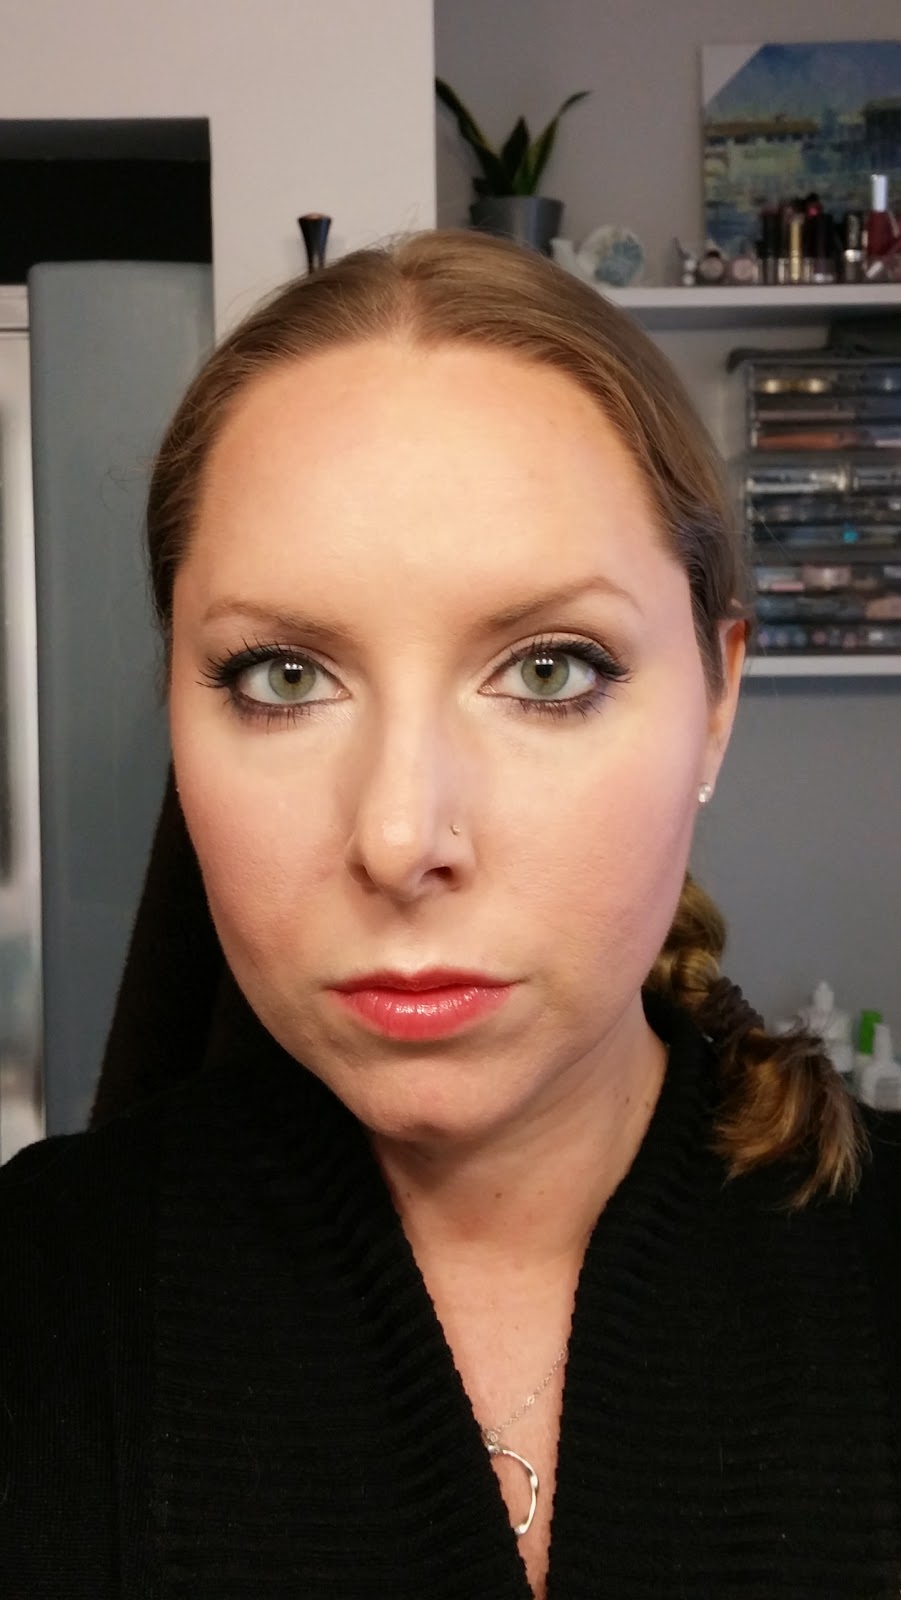
For this look, I used everything in the palette: face, eye and lip products. I began with my regular foundation routine, then used the bronzer in the palette to lightly contour and add a little warmth to my face. The bronzer is a little warm for my skin tone this time of year, but if used sparingly I think it creates a nice glow; in the summer this shade will be perfect! The blush is super pigmented, so it's easy to go overboard when applying. To avoid clown-face, gently dab the brush in the blush and tap off any excess, then apply with a light hand. It is easier to build up the color than try to take some away. 


For the eyes, I started off with a primer, and then applied 50/50 from lashline to brow bone. I used Fix as my transition color, blending it into the crease and up toward the brow bone. I then pressed Stun onto the lid, keeping it below my crease. I added Dare to deepen the look, concentrating on the outer crease area, and then used Resist on the outer V to add dimension. To add a pop of light, I tapped Dive onto the center of my eyelid.  Lastly, I used 50/50 again on my inner corners to brighten things up, and applied Dare to my lower lashline using a pencil brush. I used the 24/7 liner in Stag  on my upper lash line, making the line thicker on the outer edge and thinning it out toward the inner eye. I also applied the liner  to my lower waterline. Two coats of Perversion mascara completed the look. 


On my lips I used the naked gloss in Sesso by itself to give you an idea of what it looks like. While it adds a nice hint of color on its own, this would be beautiful layered over a nude or mauve shade of lipstick. 

Naked Lipgloss in Sesso

Completed look


It should be noted that the shadows also work very well when used wet. The shimmer shades take on a foil effect, which really adds some oomph when you want a more glamorous look. To use a shadow wet, first dip the brush into the desired shade, and then mist the brush itself with water or setting spray. Do not wet the pot of shadow directly, as it may form a crust that will make the shadow harder to use in the future. 

This is just a little peek at what the shade Dive looks like when applied wet - I did a quick look with Dive all over the lid, Fix lightly placed in the crease and 50/50 as a highlight. Applying the eyeshadow wet gives the look more depth and sheen; the other two shimmer shades, Resist and Stun, also look amazing when applied wet. 


Final Thoughts

I think this is a truly great palette. I am very happy with the colors UD included - they are all very usable, and while the shades are neutral, there is definitely enough interest added to keep them from being boring (not to mention, the shades are fabulous for any time of year). The ability to wear the shades wet or dry gives you more combinations, making it a very versatile palette. The only item it is lacking, IMO, is a deep matte brown or black shade to add drama and depth. I can understand their reasoning for making 50/50 so large, but they should have made it the same size as the other shadows and added a darker matte color. If need be I can always use such a shade from another resource, so it's  not a  deal breaker...it just would have been that much more convenient if it was included.  
While the packaging is slightly bulky, it houses a lot of product, so I can't complain too much. All I really need to do for a quick getaway is throw this compact in a makeup bag - along with foundation, concealer, powder and maybe a lip liner - and I'd be good to go. Easy peasy. In conclusion, I am more than satisfied with the Urban Decay Naked on the Run Palette, and I know it will be getting a lot of use this summer on my weekend beach escapes.

Have you tried out  Naked on the Run? What is your take on it? 

Thanks for spending some time with me today - live a beautiful life!

~Jessica


Sunday, January 4, 2015

Cover Girl Ready Set Gorgeous Foundation Review and Application Routine

Hi Lovelies!

While perusing the aisles of CVS looking for a quick and easy everyday foundation, my eye landed upon CoverGirl Ready Set Gorgeous Foundation. It fit all my needs: oil free, shine controlling, easy-to-use packaging, they had my color match, and it was a fantastic price. It runs for $8.99 at my local CVS, but I had $5 in extra bucks, so I only paid $4 - what a deal!


I have to tell you, the first couple of times I used this product I was just. not. impressed. I was deeply disappointed because I had heard such awesome things about it , such as it almost completely covers imperfections, it controls shine for hours, and it stays put all day. Why wasn't it working for me??? Now here's where I confess that the first time I tried CoverGirl Ready Set Gorgeous Foundation was when I was on a cruise to Bermuda... I did not bring my trusty Beauty Blender,  nor did I bring my coveted Sigma F80 Flat Kabuki. Nope. I brought a disposable wedge sponge in the hopes of paring down my makeup kit. Big mistake. Huge! Not only was I trying a foundation for the first time while abroad, but I didn't even bring the proper tools!  What was I thinnnkkking??


I've heard it said that this foundation is so easy to use that it can be applied with your fingers, but seriously, I am not a finger-application kind of girl. I never get even coverage, my foundation always ends up streaky - it's a hot mess. Which is why I brought along the wedge sponge, thinking it would do the job. It did not. Luckily I did bring my favorite BB cream, and I was able to use that for the trip. Crisis averted.

Now, you may be wondering how CoverGirl Ready Set Gorgeous Foundation came to be a part of my regular foundation routine, since I had such bad luck with it on my trip. I'll tell you - it's all in the application! When I returned home,  decided to give the foundation another chance, because how can so many beauty gurus be wrong? I'm so happy I did! First I tried it with my Beauty Blender, then my Sigma F80, and it was a success both times! This just proves to me that the right tools can make or break a product. Since then, I cannot put CoverGirl Ready Set Gorgeous Foundation down! It has become my go-to every day foundation, and I love it!

Despite all the rave reviews, there are a few things I've discovered while using CoverGirl Ready Set Gorgeous Foundation: I find that it blends well, provides light to medium coverage and can be layered easily; however, while the coverage is good, it does not completely mask imperfections - concealer is needed to tackle any pesky spots. Many reviews I have seen say that this foundation eliminates the need for touch ups on oily skin, but I completely disagree. While it does keep oil at bay longer than many foundations I have tried, I still need to blot within 3-4 hours of wear. Also, this does not last all day on me. When I use this, I set it with powder and setting spray to give it extra staying power; this application process helps me get a good 6 hours of wear time, but when I need long-wearing, full day coverage I still reach for my Estee Lauder Double Wear.

The only other downfall is that it has a pretty limited color selection - 12 shades ranging from 105 Classic Ivory to 320 Soft Sable. While there is a nice mix of cool and warm tones, you may have to get creative and combine two colors to get your perfect match. I have been using the shade 115 Buff Beige, which is perfect for right now, but as I grow paler I  will have to drop down a level or two. Shade 110 Creamy Natural seems to be on the pink side, so I will most likely end up mixing Shade 105 Classic Ivory with the 115 Buff beige to achieve the correct color for my skin tone.

Now on to the fun part - pictures of me applying makeup - lucky you!

I start by applying a primer to  a freshly washed and moisturized face. Today I used Too Faced Primed and Poreless, which I use sparingly and apply by patting it onto my most oily areas (forehead, nose and chin).


Next I squeeze out a dime-sized amount of CoverGirl Ready Set Gorgeous Foundation onto my finger, and dab it all over my face and upper neck area, with the most product in the center of my face.

I then take my Sigma F80 Flat Kabuki and start to stipple it all over my face, spreading out the foundation so that there is more product in the center (where I need more coverage), and less toward the perimeter.

Once my face and neck are covered, I then buff the product into my skin to get a seamless, airbrushed look. I pay special attention to blending out the edges so there are no harsh lines, especially around my jaw and my ears/ hairline. I actually bring the foundation down my neck, working it in until the transistion from foundation to bare skin is unnoticeable.


Following my foundation, I spot correct any areas that might need extra coverage,  and make sure there are no obvious lines of demarcation.


From there, I apply my under eye corrector (check out my Undereye Concealer Routine)  and blend it out with the E.L.F. Flawless Concealer Brush. This helps cover up the dark circles on the inner corners of my eyes.


I then apply a brightening concealer anywhere I want to add light - mainly underneath my eye area, the bridge of my nose, the center of my forehead and my cupids bow. I blend out the concealer with the Sigma F86 Tapered Kabuki, which really blends nicely around the contours of the eye.


Lastly, I apply setting powder with a large, soft puff, pressing the powder into my skin, not swiping it. Pressing or rolling the powder helps keep oil at bay longer, and creates a smooth, lasting finish.


 And there you have, my completed foundation/ concealer routine for quick, everyday makeup :)


From here, I go on to contour, highlight, apply blush etc., which really adds life back into my face. I actually look creepy with just foundation and concealer, lol... if you are interested in seeing my contour/highlight routine, let me know :)

Have you tried the CoverGirl Ready Set Gorgeous Foundation? If so, what is your take on it?

Thanks so much for reading - live a beautiful life!

~Jessica