Featured Post

So Fresh and so Clean: DIY Daily Brush Cleaner!

Let's talk makeup brushes: they are a necessity for an expertly applied face, but they can be a PITA to keep clean! Cleaning your brushe...

Showing posts with label Look. Show all posts

Tuesday, January 20, 2015

Review and Look: Urban Decay Naked on the Run

I purchased the Urban Decay Naked on the Run Palette the first day it came out, so now I've had almost  two months to play with it and give you my thoughts.


According to Urban Decay, this "ultimate travel kit for Naked junkies... comes with everything you need for a complete Naked look", and I must agree with that statement. Aside from items such as concealer, foundation, and setting powder, you can easily create a complete look using only items from this palette.

Naked on the Run comes housed in a metal compact that measures approximately  5.5 x 5.5. It is rose gold in color, with "mesmerizing artwork" on the top of the case. The artwork sort of reminds me of those Rorschach tests - not really my style, but I guess it's a cool effect.

The included mirror is huge - essentially the size of the compact itself.  If you are traveling and this is the only mirror you have available, you shouldn't have any issues with seeing your entire face.


Naked on the Run comes with 6 "never before seen shades" of eyeshadow, a blush, bronzer, lipgloss, eyeliner and mascara. Many people think that the large white product on the lower right corner is a highlighter, but it is in fact an eyeshadow, which UD dubs "the perfect all-over shade"; however, being a slightly shimmery cream color, it can double nicely as a highlighter if needed. 


The shades of eyeshadow are: Dive (metallic rose with golden micro-shimmer), Fix (soft taupe matte), Resist (medium metallic taupe), Dare (medium brown matte), Stun (metallic bronze with light gold micro-shimmer) and 5050 (cool bisque satin). The Blush and bronzer do not have any names, but the website describes the bronzer as being a medium bronze matte and the blush as a vibrant pink with light shimmer


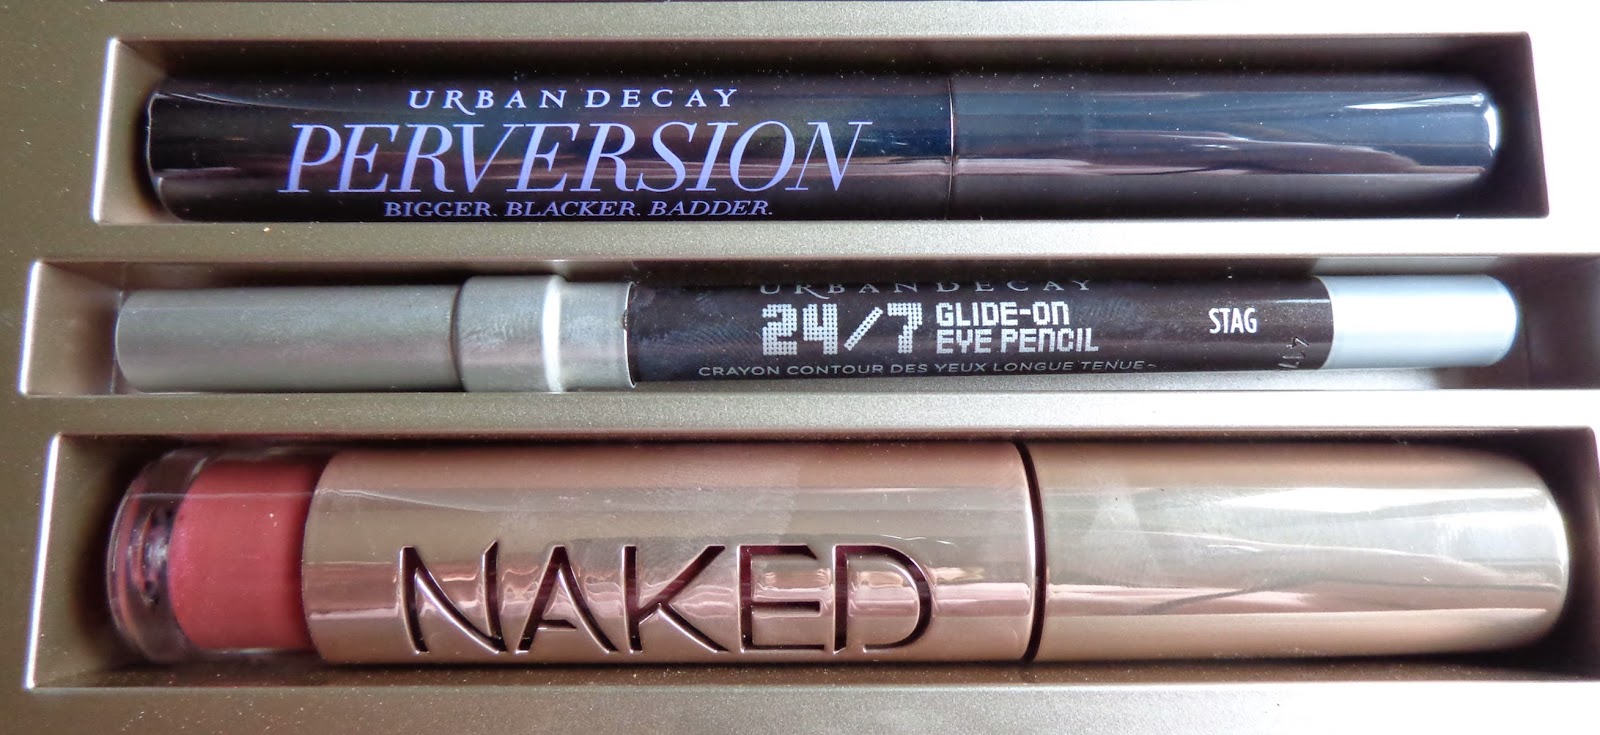
The palette also comes with a travel size Perversion Mascara, a travel size 24/7 Glide on Eye Pencil in Stag (a deep brown satin) and a full sized Naked Lipgloss in Sesso (rose with pink shimmer). On the website, UD emphasizes the fact that the gloss is full sized:
"With a lot of all-in-one palettes, you run out of lip color long before everything else. Not so with Naked on the Run, because the Naked Lipgloss is FULL-SIZE"  
It is a nice feature to have in the kit, and it allows you to swap out shades with other UD glosses you might own. You can also swap out eyeliners (if you have other travel sized shade, or you have used enough of a full sized shade that it will fit into the slot). The only thing that you might have trouble replacing is the mascara... unless you're like me and have a bazillion mascara samples. Out of all the small mascaras I have, one or two are bound to fit....right? 


Now for some swatches:


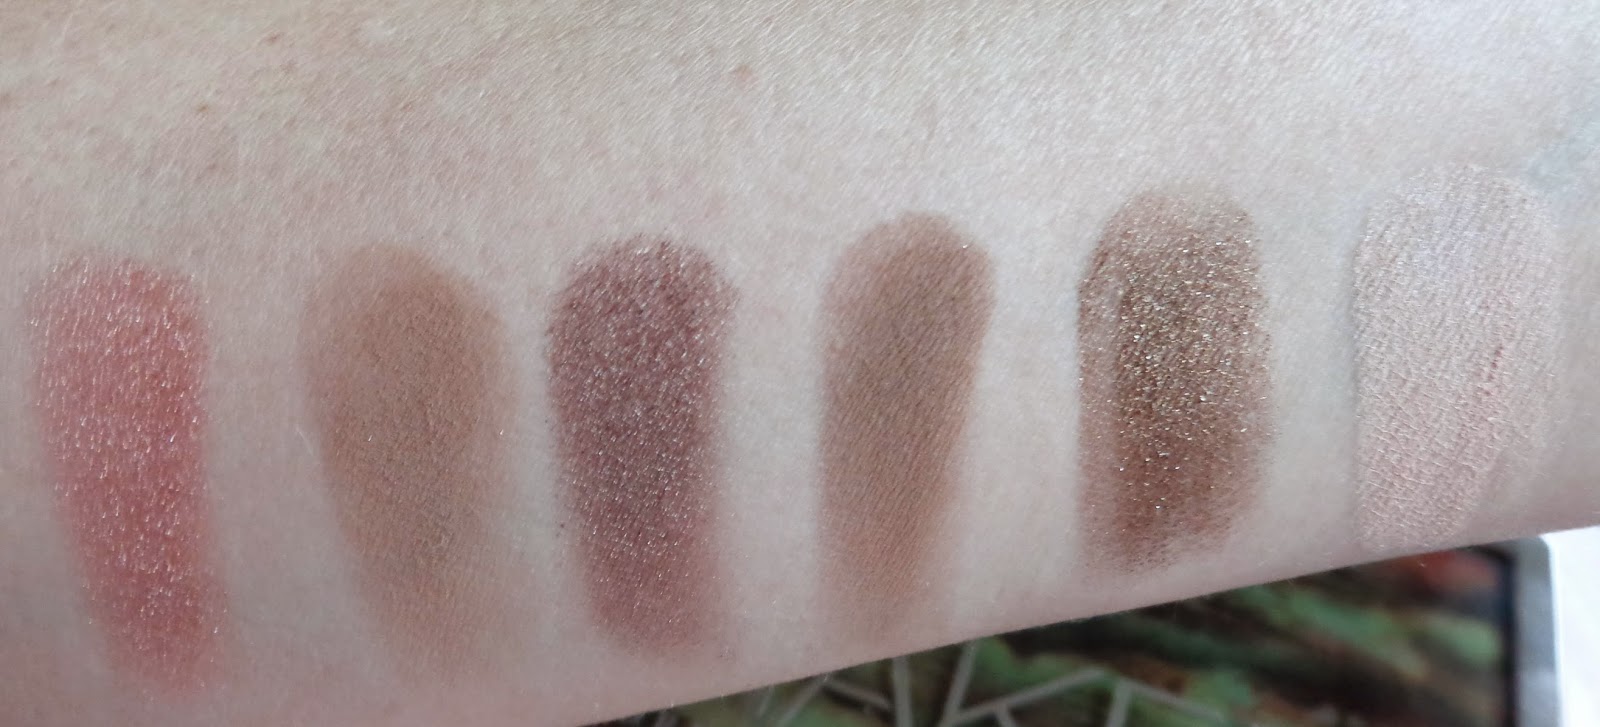
 L-R: Dive, Fix, Resist, Dare, Stun and 50/50


L-R: Bronzer, Blush, Eye Pencil in Stag and Lip Gloss in Sesso
 All powder products are nicely pigmented and blendable, with the texture and consistency I've come to expect from Urban Decay. While there is some fallout, that is no big surprise as many  UD shadows have a little fallout, especially those with shimmer. The lipgloss is absolutely lovely - a "your lips but better" shade great for everyday. The liner included in the palette is my all-time favorite liner color - a deep blackish-brown shade that works for all occasions.


For this look, I used everything in the palette: face, eye and lip products. I began with my regular foundation routine, then used the bronzer in the palette to lightly contour and add a little warmth to my face. The bronzer is a little warm for my skin tone this time of year, but if used sparingly I think it creates a nice glow; in the summer this shade will be perfect! The blush is super pigmented, so it's easy to go overboard when applying. To avoid clown-face, gently dab the brush in the blush and tap off any excess, then apply with a light hand. It is easier to build up the color than try to take some away. 


For the eyes, I started off with a primer, and then applied 50/50 from lashline to brow bone. I used Fix as my transition color, blending it into the crease and up toward the brow bone. I then pressed Stun onto the lid, keeping it below my crease. I added Dare to deepen the look, concentrating on the outer crease area, and then used Resist on the outer V to add dimension. To add a pop of light, I tapped Dive onto the center of my eyelid.  Lastly, I used 50/50 again on my inner corners to brighten things up, and applied Dare to my lower lashline using a pencil brush. I used the 24/7 liner in Stag  on my upper lash line, making the line thicker on the outer edge and thinning it out toward the inner eye. I also applied the liner  to my lower waterline. Two coats of Perversion mascara completed the look. 


On my lips I used the naked gloss in Sesso by itself to give you an idea of what it looks like. While it adds a nice hint of color on its own, this would be beautiful layered over a nude or mauve shade of lipstick. 

Naked Lipgloss in Sesso

Completed look


It should be noted that the shadows also work very well when used wet. The shimmer shades take on a foil effect, which really adds some oomph when you want a more glamorous look. To use a shadow wet, first dip the brush into the desired shade, and then mist the brush itself with water or setting spray. Do not wet the pot of shadow directly, as it may form a crust that will make the shadow harder to use in the future. 

This is just a little peek at what the shade Dive looks like when applied wet - I did a quick look with Dive all over the lid, Fix lightly placed in the crease and 50/50 as a highlight. Applying the eyeshadow wet gives the look more depth and sheen; the other two shimmer shades, Resist and Stun, also look amazing when applied wet. 


Final Thoughts

I think this is a truly great palette. I am very happy with the colors UD included - they are all very usable, and while the shades are neutral, there is definitely enough interest added to keep them from being boring (not to mention, the shades are fabulous for any time of year). The ability to wear the shades wet or dry gives you more combinations, making it a very versatile palette. The only item it is lacking, IMO, is a deep matte brown or black shade to add drama and depth. I can understand their reasoning for making 50/50 so large, but they should have made it the same size as the other shadows and added a darker matte color. If need be I can always use such a shade from another resource, so it's  not a  deal breaker...it just would have been that much more convenient if it was included.  
While the packaging is slightly bulky, it houses a lot of product, so I can't complain too much. All I really need to do for a quick getaway is throw this compact in a makeup bag - along with foundation, concealer, powder and maybe a lip liner - and I'd be good to go. Easy peasy. In conclusion, I am more than satisfied with the Urban Decay Naked on the Run Palette, and I know it will be getting a lot of use this summer on my weekend beach escapes.

Have you tried out  Naked on the Run? What is your take on it? 

Thanks for spending some time with me today - live a beautiful life!

~Jessica


Friday, October 10, 2014

EOTD: Coastal Scents Revealed 2

Hi lovelies!

So, I went out the other night, and decided to play around with my new Coastal Scents Revealed 2 Palette ($19.95) to see what kind of fun nighttime look I could achieve.

Coastal Scents Revealed 2

This is what I came up with:


I am going to apologize in advance if this comes off as being overly complicated; it is a pain in the ass   little bit difficult to explain a look when the eyeshadow colors do not have names; I had to assign the colors numbers in the order I used them, which makes it a bit monotonous, but we do what we can, right?

To get this look, I applied Lorac Behind the Scenes Eye Primer all over my lid from lashline to brow. I then applied a thin layer of Maybelline Color Tattoo Metal in Inked in Pink all over my lid to set a base.  Using the Coastal Scents Revealed 2 Palette, I applied color number 1 as a transition color, sweeping it onto my entire crease and blending out. I applied color number 2 to my lid, up until the crease. I then took color number 3 and used it to deepen the outer half of my crease. I used color number 4 on my outer v, blending it ever so slightly into the outer crease, and then used a tiny bit of color number 5 to add a little more depth to the outer v. To get a bit more of a gradient effect, I used shade number 6 just above the transition color, and then shade number 7 to highlight my brow bone. As a final step, I dipped a pencil brush into color number 8 and used it to brighten my inner corners and smudged a little underneath my inner lower lash line, and I also swept a little bit of number 2 on my outer lower lashline.

To complete the look, I applied Wet n' Wild On the Edge Creme Liner by Fergie in Little Black Dress to my upper lashline, winging it out a bit. I used Revlon Colorstay Creme Gel Eyeliner in Charcoal on my lower waterline. I applied two coats of MUFE Smoky Extravagant Mascara in black to my upper and lower lashes, followed by Eylure Naturals Eyelashes in No. 031.


I have to say, the more I experiment with the Coastal Scents Revealed 2 Palette, the more I like it! There is a lot of versatility in this palette; at first glance, many of the colors do look quite similar, but they really take on a life of their own when applied! You can create endless looks with this palette, from sparkly night-on-the-town to subdued-work-day. I'm so glad I decided to purchase it, and I highly recommend it!

What's your current favorite versatile palette? Do you own the Coastal Scents Revealed 2 Palette? If so, do you have a go-to combo?

Thanks for spending some time with me today; until next time...

Live a beautiful life!

~Jessica


Friday, September 26, 2014

NYC Best of Broadway IndividualEyes Custom Compact Review and Look

The NYC Individualeyes Custom Compact is a fairly new product from New York Color that is designed to work with your eye color and create an individual look. There are 8 different color combinations to choose from that enhance the look of green, blue and brown eyes. 4 of the palettes have names referencing popular NY hot spots, like Union Square and Soho Grand, and the other four offer a more smoked-out look and have names that are very simple, such as Smokey Charcoal and Smokey Greens. The pallettes can be purchased at CVS for about $4.99 - $5.49 depending on where you live (The CVS in my area always is always higher priced -gotta hate it love it!)

Best of Broadway
On the NYC website, it states that this "all-in-one compact has everything you need for a complete look: primer, illuminator, applicator and complementing shadows. With four colors specially coordinated to intensify and enhance your eye color, you can create a look as individual as you are."


I purchased the palette named Best of Broadway, which is a bronze-based paletteOn the package it says that these shades are best suited for brown eyes, but I really liked the shades and found them very fall appropriate, so I decided to see how they work with green eyes.


The compact comes with a plastic cover that indicates what each shade/ product is used for, as well as a diagram on the back to act as a guide,  so if you are new to the whole eye-makeup thing you know what color goes where.


The palette comes with 4 shadows: a shimmery cream, a yellow gold, a coppery bronze, and a  muddy brown (which is the only matte shade). 


The gold and bronze shades have the best pigmentation of the bunch, but all three shimmer shades feel soft and apply smoothly. The matte brown is pretty chalky, and it takes a few extra swipes to achieve a decent color payoff. 


The compact also comes with two cream products: a base, and an illuminator.


The base is a light/medium skin tone and is similar in texture to a cream concealer. The illuminator is a pearly white shade, and is rather thin feeling and slightly greasy. They both have fairly good pigmentation. 


L-R: base and illuminator

If you have normal-to-dry eyelids, the primer included in the compact might work for you; but if your lids tend to be more oily, like mine, stay clear! The first time I tried this shadow, I used the included base, and - DISASTER! -  all the shadow was gone from my eyelid within two hours!! Let me repeat: TWO HOURS!!! Yeah, it was a bad day...  However, when I used my Too Faced Shadow Insurance, I had much better results and the shadow stayed in place for most of the day (I'll count that as a win!).

I did experience some fall-out while applying the shadow, which is to be expected, but it wasn't terrible. I enjoyed the shimmery shades - they apply fairly well and blend out nicely. As for the matte brown, I am simply not a fan- it was patchy and did not blend out well, creating an unattractive muddy look. I found that, as long as I did not try to add too much matte brown to the equation, I could achieve a respectable eye look with this compact.


For this look, I first applied Milani Bella Eyes in Bella Cafe to the crease. Using the NYC Individualeyes Custom Compact in Best of Broadway, I added the gold shade to the inner half of the lid and the bronze shade to the outer half, keeping the shadow under the crease. Using a small crease brush, I added a little bit of the matte brown to the outer v, blending it up into the crease. I used the pearly cream shade under the brow  and on the inner corners as a highlight.  With a pencil brush, I applied the bronze shade to the outer lower lashline and the gold to the inner lower lash line, blending the two in the center. I used Stila Smudge Stick in Damsel to line my top lashline, and finished things off with two coats of MUFE Smoky Extravagant Mascara in Black.


On the rest of my face, I have Estee Lauder Double Wear Foundation in the shade 2N1, NYC Smooth Skin Bronzer in the shade Sunny,  Tarte Amazonian Clay Brow Mousse in Taupe,  Elizabeth Mott Tints & Sass in Cherry and Mary Kay Translucent Loose Powder.


To be honest, I feel rather lukewarm about the NYC Individualeyes Custom Compact. The colors are really pretty, and they swatch well enough, but when you apply them to the eyelid they just don't come off as pigmented, and they are hard to blend. For a makeup beginner, or someone who likes a more muted look, this would be a great palette to pick up. I really like how the compact includes a diagram and labels to show a new user how and where to apply the shadows. The price point is fantastic, and the quality is not bad for the price. I did not like the base or the illuminator, but I think that mostly has to do with the fact that I have oily skin and the products did not stay in place; if you have drier lids these products might work better for you. As for making your eyes "pop", I picked a palette that is intended for another eye color, so I can not give an opinion on this except for stating the obvious: it did nothing special for my green eyes (surprise!). I'd be curious to see how the palette designed for green eyes works, and I may purchase Smokey Greens  just to see (if I do, I will let you know my thoughts).  Overall, I think that you get your money's worth from this $5 compact; as long as you don't expect champagne quality from this beer-budget product, you will be happy with it.

Have you tried any of the NYC Individualeyes Custom Compacts? If so, did you use a combo created for your eye color, and did it help to emphasize your eyes? What are your thoughts on the product overall?

~Jessica